How To Stand Up Paddle Board - Inflatable SUP Addition
Simple steps for first time paddle boarders
So, you’re new to paddling boarding?
We've put together a few simple steps to help you correctly set up your paddle board kit, and get onto the water safely. We’ve included lots of juicy tips perfect for you newbies. Just an FYI, this blog is focused around inflatable paddle boards (iSUP) and paddling on inland waterways in the UK.
Before we go any further, don't forget your SUP needs to be licensed for any inland waterways. You can do this here, it's only £45 for the year. Family discounts are also available. Remember to wear a buoyancy aid or flotation device and keep a phone on your person. More on safety here.
Right, you're unpacking your SUP for the very first time, ahhh how exciting! What do I do now………..?
How to inflate my board to the correct PSI (hand or electric pump)
The recommended PSI (pounds per square inch) should be written on your board or in the manual.
Whatever you do, please do not underinflate it because you think it feels hard enough. Underinflation will make your board less buoyant and unsafe.
Hand pump
Before use, connect the hose to the inflation outlet of the pump
Unroll paddle board and remove valve cap
Make sure the valve is engaged and set to inflate (this means that the push down part of the valve is sprung up)
Insert your hose by pushing in and twisting until it locks in place
Pump away! Be patient, it takes time and effort and you just have to keep on going
Most iSUP’s will come with a manual hand pump, all pumps may be different so check the manual.

Set your valve to inflate - this means that the push down part of the valve is sprung up
Electric pump
Before use, connect the hose to the inflation outlet of the pump
Unroll paddle board and remove valve cap
Make sure the valve is engaged and set to inflate (this means that the push down part of the valve is sprung up)
Most electric pumps will have a digital readout where you can set the desired PSI and will have an auto cut off, so it won’t overinflate
Connect the hose to the board by pushing in and twisting until it locks in place
Make sure you have some spare fuses on you, the first time we used our electric pump (12 V) it blew the cigarette lighter fuse. Ooooopsy.

Remember to connect the hose to the inflation outlet of the pump
Tip: If you’re having trouble with your electric pump fitting the valve on your board, this could be because it has the wrong o ring fitted to the hose. Each board manufacturer seems to use slightly different valves which need slightly different o rings. Don’t worry, you can remove the o ring from your manual pump (supplied with your SUP kit) and swap it with the one fitted on your electric pump. If you're lucky enough, your pump might come with a packet of different sized o rings.

O rings
How to adjust my paddle according to my height
There’s a variety of different methods, we find the simplest method to be the arms up trick.
Stretch one arm up into the air and rest your wrist on the handle of your paddle. Lock into place with the height adjustment clamp. Away you go.
This should mean that when you’re paddling standing up, the handle should be roughly inline with your face.

Stretch one arm up into the air and rest your wrist on the handle of your paddle to get the correct paddle height
Tip: When you use your paddle for the first time, it’s important to tighten the clamps using either an allen key or screwdriver, depending on the design. Make sure the clamps are locked shut before tightening the screws. Having the clamps tight will prevent the handle part of the paddle from slipping round.
How to attach the fins
Slide and clip
Most budget friendly boards will have this type of removable fin
Fin slides into the slot at the back of the board
Most budget boards have a little clip to hold the fin in place
Some boards have flexible plastic fins permanently attached
US fin box
Premium boards tend to feature a US fin box configuration
Fin slides into the slot at the back of the board
Held in place with a screw and a plate
You may need an allen key or screwdriver to tighten into place

Typical US fin box
Where to wear my leash
Most paddle boards come with a coiled leash which It attaches to the back of your board. Fyi, the velcro loop is not for putting on your wrist, it’s for your ankle or sometimes calf. If your board doesn’t come with one, then you will need to buy one.
The point of a leash is to maintain control of your board after falling in and keep you safe. Your paddle board is essentially your life raft and in nearly all cases you will want to be attached.
Where you wear your leash depends on the environment you’re paddling in. Following British canoe union guidance, If you are paddling on slow moving deepwater rivers then wear it on either your ankle or calf. For fast moving deep water, which we wouldn't recommend for beginners, a quick release belt is a more suitable option.
We have gotten into the habit of wearing quick release belts at all times. We feel this is good practice as they easier and faster to remove in case of emergency. Waist belts are also more comfortable and as they are lifted up off your board, so you don’t tend to step on it when you’re moving around on your SUP.
Quick release belts can easily be attached to your ankle leash that came with your board. Here are some brands to check out: Palm, Panda Board Sports, East Coast Paddle Co.
Do I need to wear a buoyancy aid?
Simple answer, yes!
You can be the best swimmer in the world, but if you fall in, shock, panic and exhaustion can set in pretty quick. A buoyancy aid helps you keep afloat reducing the need to expel energy treading water. We recommend a buoyancy aid or personal floatation device.
Tip: Buoyancy aids are different to life jackets. Most modern life jackets are auto inflatable which means they inflate the second they touch the water. The reason you would not wear a life jacket paddle boarding is because if you fall in (which is very likely) then your life jacket will inflate and it will have to be rearmed after each inflation.
How to get on a paddle board
Always get on to your paddle board kneeling first.
Never attempt to stand on your board next to a bank. If you attempt to get on your board whilst standing, you increase the risk of the board floating away from you, resulting in either falling in or falling back and causing injury. Same goes to returning.
Get back onto your knees as you approach the bank/beach/jetty/ pontoon.
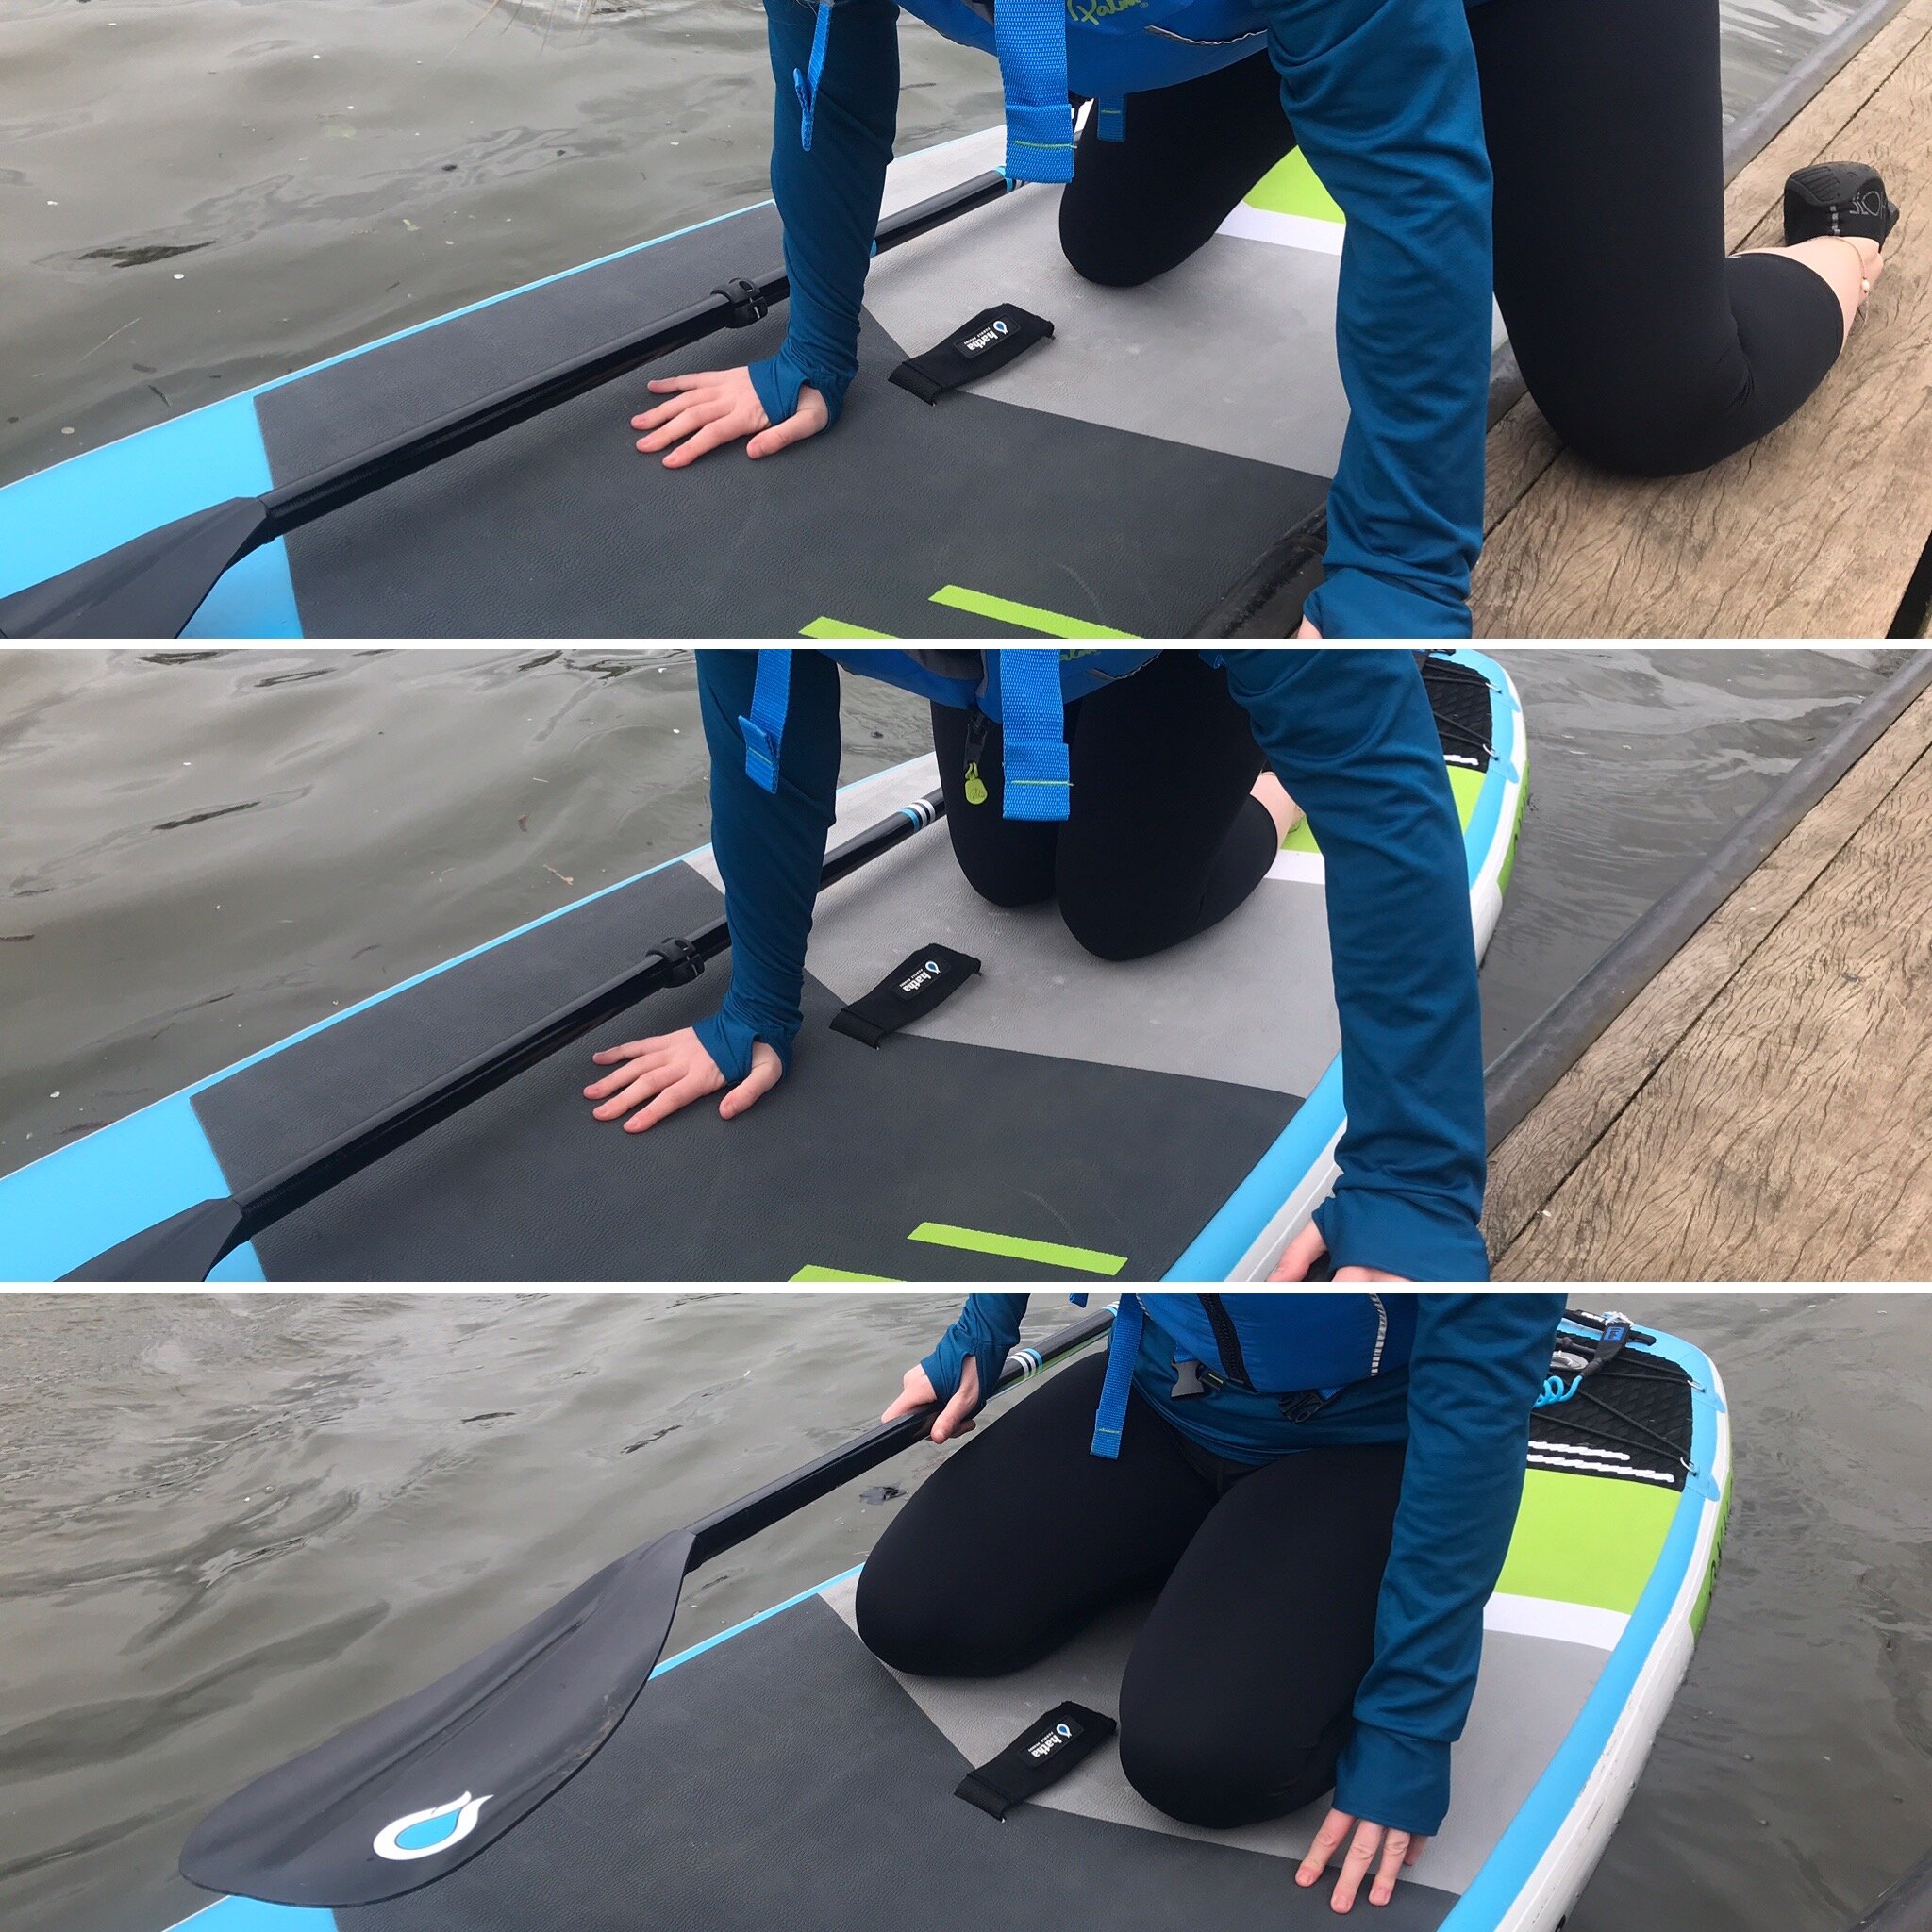
Always get on to your paddle board kneeling first, you want to aim for the carry handle, this is usually the centre of the board
How to get back on my paddle board if I fall off?
First of all, if you do fall in, try to stay relaxed. Here's a fabulous link to the RNLI guide on falling in.
The two most common techniques are
1. From the side - use the centre handle to pull your upper body onto the board and kick your feet for extra oomph!
2. From the back (the seal on a rock technique) - approach the board from the rear putting your body weight on the board. Put your hands on either side of the board and pull yourself back on. Imagine yourself as a seal climbing on to a rock.
Tip: If you’re struggling, swim over to the bank/shallow water where you can stand, and get back on - kneeling first!
How to actually stand up
There are several organisations who teach/instruct/coach, with that different syllabus’s have been written. This means there are more than one way of doing things. And ultimately you have to work out whats best for you.
Here are a few simple steps you can try to get you standing for the first time. Remember to never attempt to stand on your board next to a bank.
Starting from a kneeling position with your weight in the middle of the board (normally where the carry handle is)
Position your knees shoulder width apart, the wider your feet/knees, the more stability
Familiarise yourself with paddling on your knees until you feel confident enough to stand
Go down on all fours with your paddle under the palms of your hands
Slowly position your feet where your knees were
Bring yourself to a squatting position keeping your feet flat
Slowly stand bringing your paddle with you
Look ahead, not to the floor
Tip: Get momentum before standing and once standing carry on with your paddle stroke asap to continue momentum. SUP’s are more stable when moving.
What way round should my paddle face
The blade on most paddles will have a spoon shape to it and you want to spoon the water towards you. Don't be confused by the offset angle of the blade, you want the blade angle away from you.
Tip: Most brands have logos on the front of the blade, so you want the logo facing you.

You want to spoon the water towards you
How to hold the paddle and take a forward stroke
Holding your paddle
One hand on the t shaped handle
Other hand on the shaft - hands a minimum of shoulder width apart
You want your hands in roughly a 90 degree angle

Hold your paddle in roughly a 90 degree angle
Taking a basic forward stroke
Start with your dominant hand on the t shaped handle
Place the blade in the water near the front of the board
Pull the blade towards you
Keep the blade close to the rail (side) of the board
You want the majority of the blade in the water
Arms should be relatively straight when paddling
Always put the blade in the water the opposite side of your hand holding the t shaped handle
To maintain a straight course, you will need to paddle on both sides (to do this, switch hands and don’t cross over)
How to turn
Again there are many techniques to learn.
Semi circle strokes forwards or backwards
Advanced: pivot turn, cross over technique, stepback turn
Tip: You want to make sure the t shaped handle is inline with your blade, not off at a funny angle.
What side of the river should I paddle on?
For inland waterways and rivers, always paddle on the right hand side.
Stay as close to the bank as possible, be courteous to other vessels, and give way to everyone. Remember to watch out for fisherman and swimmers.
Tip: Give a friendly shout to rowers as they travel facing backwards and they don’t always see you.
Checking for punctures & deflating my iSUP
To check for punctures all you need is a bucket of soapy water!
After each paddle, before deflating have a quick check for any damages and punctures. If you have a bad puncture you'll be able to hear it. If you're having trouble finding a puncture, chuck a bucket of soapy water on it and look for the bubbles.
Deflating your board is a matter of simply removing the valve cap, pressing down and turning the valve clockwise. This will lock the valve open releasing the air from the board.
Tip: Once the majority of the air has left the board it's worth using either your manual pump or electric pump connecting the hose to the deflate outlet on the pump to suck the remaining air out.
So how was your first paddle?
Awesome? Wobbly? Wet? If you’d like to share with us any cool locations or paddle routes you’ve found, let us know where you launched and we'll add it to our directory. We love sharing with everyone any cool places we find.
Here’s a list of some of our favourite locations to launch along the Thames - Top 10 spots to launch
If you haven’t got your own iSUP yet, check out our guide - Buying your first inflatable paddle board
We hope this blog was useful, thank you for checking it out.
India & Joshua
Follow us on social media for more top tips